Hairline Design Dallas
Hairline Transplant Design
Introduction to Hair Transplant Hairline Design
The first step in hair replacement is the design of the proposed hairline. In a way, it is also the most important step and upon which the remainder of the procedure is based upon (unless of course the objective is only to fill the central midscalp and/or crown). The hairline is also the most obvious part of a hair transplant given its exposed position right in the front. Accordingly, a properly designed hairline will establish a suitable frame to the face and create a frame as well for the remainder of the hair transplant work.
Good hairline design is truly an artistic endeavor that combines experience, judgment and a keen artistic eye. The surgeon must contemplate how that hairline will properly fit a person’s facial features, stage of hair loss, shape of the existing temple hairline, etc. To fully convey the artistic part of hairline design is clearly impossible in this tutorial. However, certain guidelines do exist to help a prospective patient understand how Dr. Lam and Ms. Karamanovski design a hairline. Part of the reason for this tutorial is to explain what should not be done when designing a hairline, as some patients who do not understand the principles of natural hairline design request a hairline that is too low or too wide that would look, in short, unacceptably unnatural. Unfortunately, a large percentage of work performed at the Lam Institute is correcting work done by other surgeons who also do not understand these fundamental principles.
This tutorial will focus almost entirely on defining the overall shape and position of the hairline. A hairline is truly not a line by the time the procedure is actually carried out. The strong line that is designed at the beginning of the case is transformed into a softened zone of transplanted hair that resembles the irregular contour of a coastline with its natural outcroppings of jetties and eddies. Therefore, a hairline can be divided into a “macro” hairline that is defined by the overall shape and position and a “micro” hairline that is composed of the actual creation of recipient sites that accommodate the hair grafts. This section will focus entirely on the “macro” hairline.
Hairline Design Positioning
The first place to begin hair transplant hairline design is to designate the lowest acceptable point of the central hairline, which is defined by the transition from the horizontal to the vertical scalp, as illustrated.
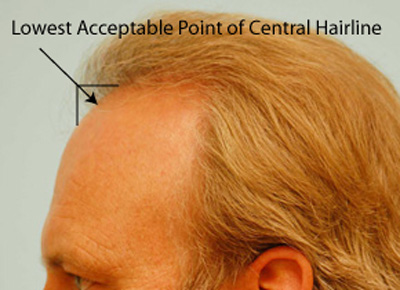 As the scalp gradually slopes from a horizontal to a vertical orientation, the intersection at 45 degrees represents the point below which the hairline will appear unnatural. Of course, the hairline may be designed above this point based on the shape of one’s head, type of hair loss encountered, recession of the temporal hair, among other criteria. Alternatively, the hairline can be designed slightly above this central point with a widow’s peak that approaches or meets this point instead.
As a reminder, this tutorial is not intended to be exhaustive and describe every permutation that can exist or every principle of hairline design ever proposed but to offer a basic lesson on what constitutes a natural looking hairline.
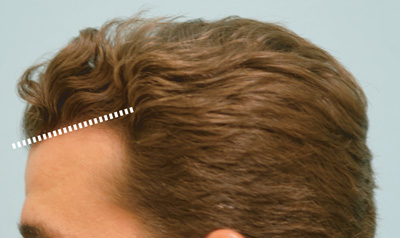 The hairline from a profile view also should slope upwards gently and never the reverse, i.e., slope downward. When designing a hairline, it is important to view the hairline from the front, obliquely from both sides, both profile views, top down, and in a mirror to ensure that the slope, angle, shape, and position are just right before beginning the hair transplant.
Hairline Shape
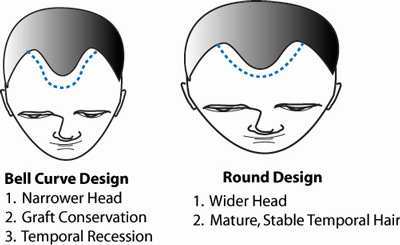 The shape of the hairline should be designed in such a way as to match a patient’s head and facial features. For instance, a wider head should have a hairline that matches the wider arc of the frontal scalp. Conversely, a narrower head should be designed with some suppression (concavity) of the outer limit of the hairline. Of course, rules are made to be broken. And that is where artistry and science meet. In addition, calculating the number of hairs that must be dedicated to the central scalp, the hairline, and the temple may also influence the possible design of a hairline. All of these considerations must be weighed when contemplating the perfect hairline shape for a particular individual.
Temple Position and Shape
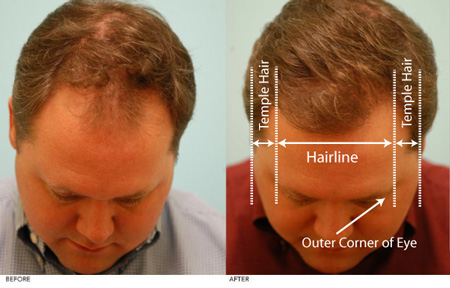 Where does the hairline end? Have you noticed why you immediately can spot a “combover”? The reason that a combover looks unnatural is that hair in the temple is swept over the central hairline, which is not how hair grows and falls on a non-receding scalp. The outer limit of the hairline falls along an imaginary point drawn through the outer corner of the eye. Any hair that falls outside of this line should be considered temple hair and should be recreated as such. That is why poorly designed hairlines that violate this rule, i.e., extend beyond the outer limit of this line, always look unnatural and are very hard to correct when poorly executed. As mentioned in the recipient site section of this website, the temple hair grows at different angles to the hairline and should be recreated differently.
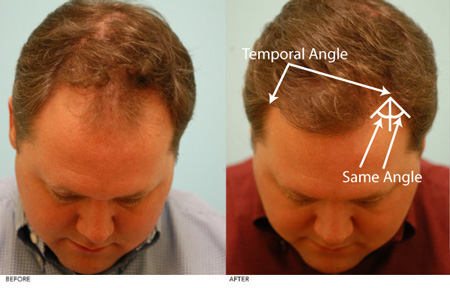 When designing the hairline, the position and shape of the temple hair must always be considered. The temporal angle represents the “unzipping” of the hairline and the temple and should exhibit an angle in which the temple and the hairline roughly match in shape and in angle. This is why a “toupee” or a hair system can at times be easily spotted as unnatural. If the toupee extends forward without temple hair that matches it, it creates what is known as a “lid effect” and thereby may appear unnatural. The temple to hairline angle should closely match. If someone wears a hat to camouflage one’s baldness, all you have to do is look at the degree of temple recession to estimate how much loss that person has centrally along the hairline. When designing a hairline, always respect the relative position and shape of the temples.


